
Designing real-world applications using the Horison Framework with NVIDIA Deepstream 6 integration
By: Rens Porre & Auke-Dirk Pietersma – 2021
Readtime: 15 minutes
Tags: Horus, AI, NavInfo, Deepstream 6, Docker, Jetson, Technical Walkthrough, GenICam, Sand Engine
Designing real-world applications using rapidly changing technologies can be challenging for companies in terms of bringing their product to market. Building a complete AI system is hard. One needs experience in the fields such as: cameras, embedded systems, networking, data-acquisition and storage. Therefore cooperation between companies, operating in different fields, can be a huge benefit to all parties involved. It’s a challenge that different fields have different and often non-overlapping sets of knowledge, thus forming liabilities for the project reaching its completion.
To address the latter, this post will cover the following:
- How a graphical representation, such as the Horus Linking Lab, can help design complex systems
- HORISON Framework, including Linking Lab, in a nutshell
- Designing a GDPR compliant camera system, using the HORISON Framework and NavInfo Europe anonymization model
- Sand Motor, an example of a real world application using the HORISON Framework
Graphical design of complex systems
Most fields employ graphical tools that assist the designer in their tasks. Well known tools include Quartus (FPGA), Matlab & Simulink and Altium Designer (PCB).
One such tool that allows designers to visualize and design applications that span different domains is the Horison Framework with Linking Lab as its graphical user interface.
Figure 1 shows Linking Lab with an application that encompasses many different parts a typical AI/software/hardware project may require. These include, cameras (physical), video-transcoding, AI inference, networking and custom client code.
For the designer there is no difference between adding a physical camera or a Docker container to the pipeline. This allows one to discuss concepts such as networking (“I would like my data to be sent over there”) with disregard of the underlying technology (tcp/udp,unicast/multicast).
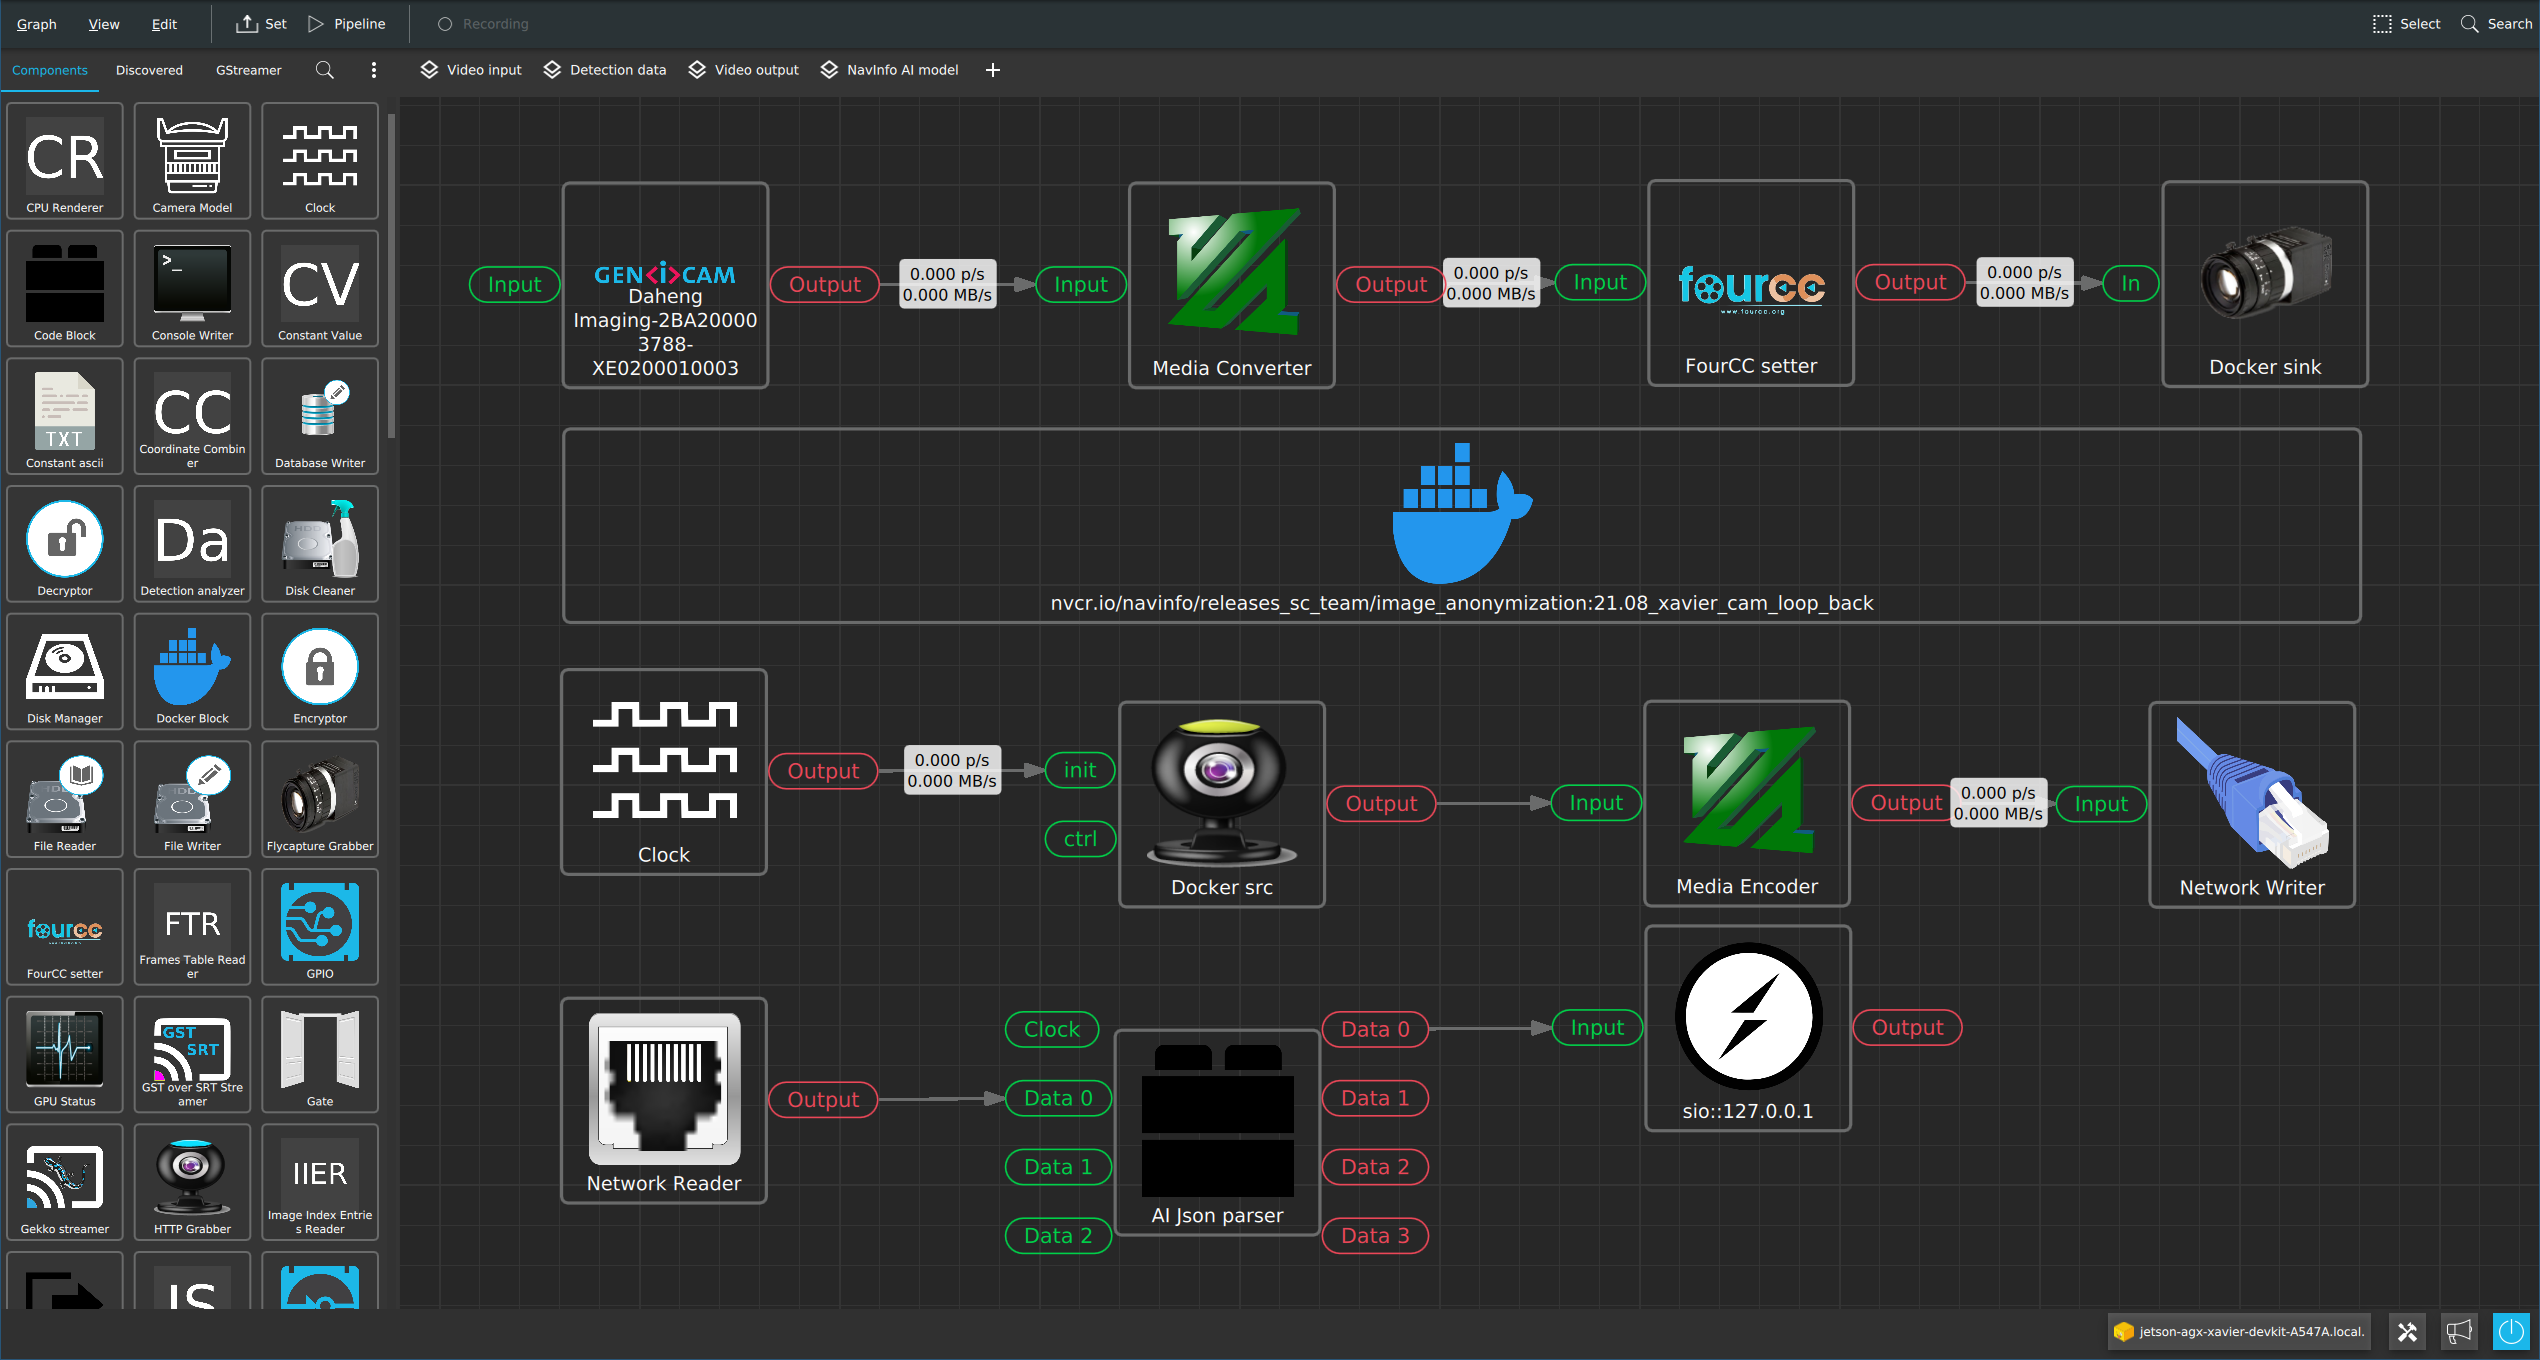
Figure 1: Graph Builder in Linking Lab
Linking Lab provides a Discovered tab (figure 2) which lists all system specific components. Components range from system services to physical devices. The HORISON Framework keeps scanning for new components. So when an extra sensor is connected it will appear automatically.
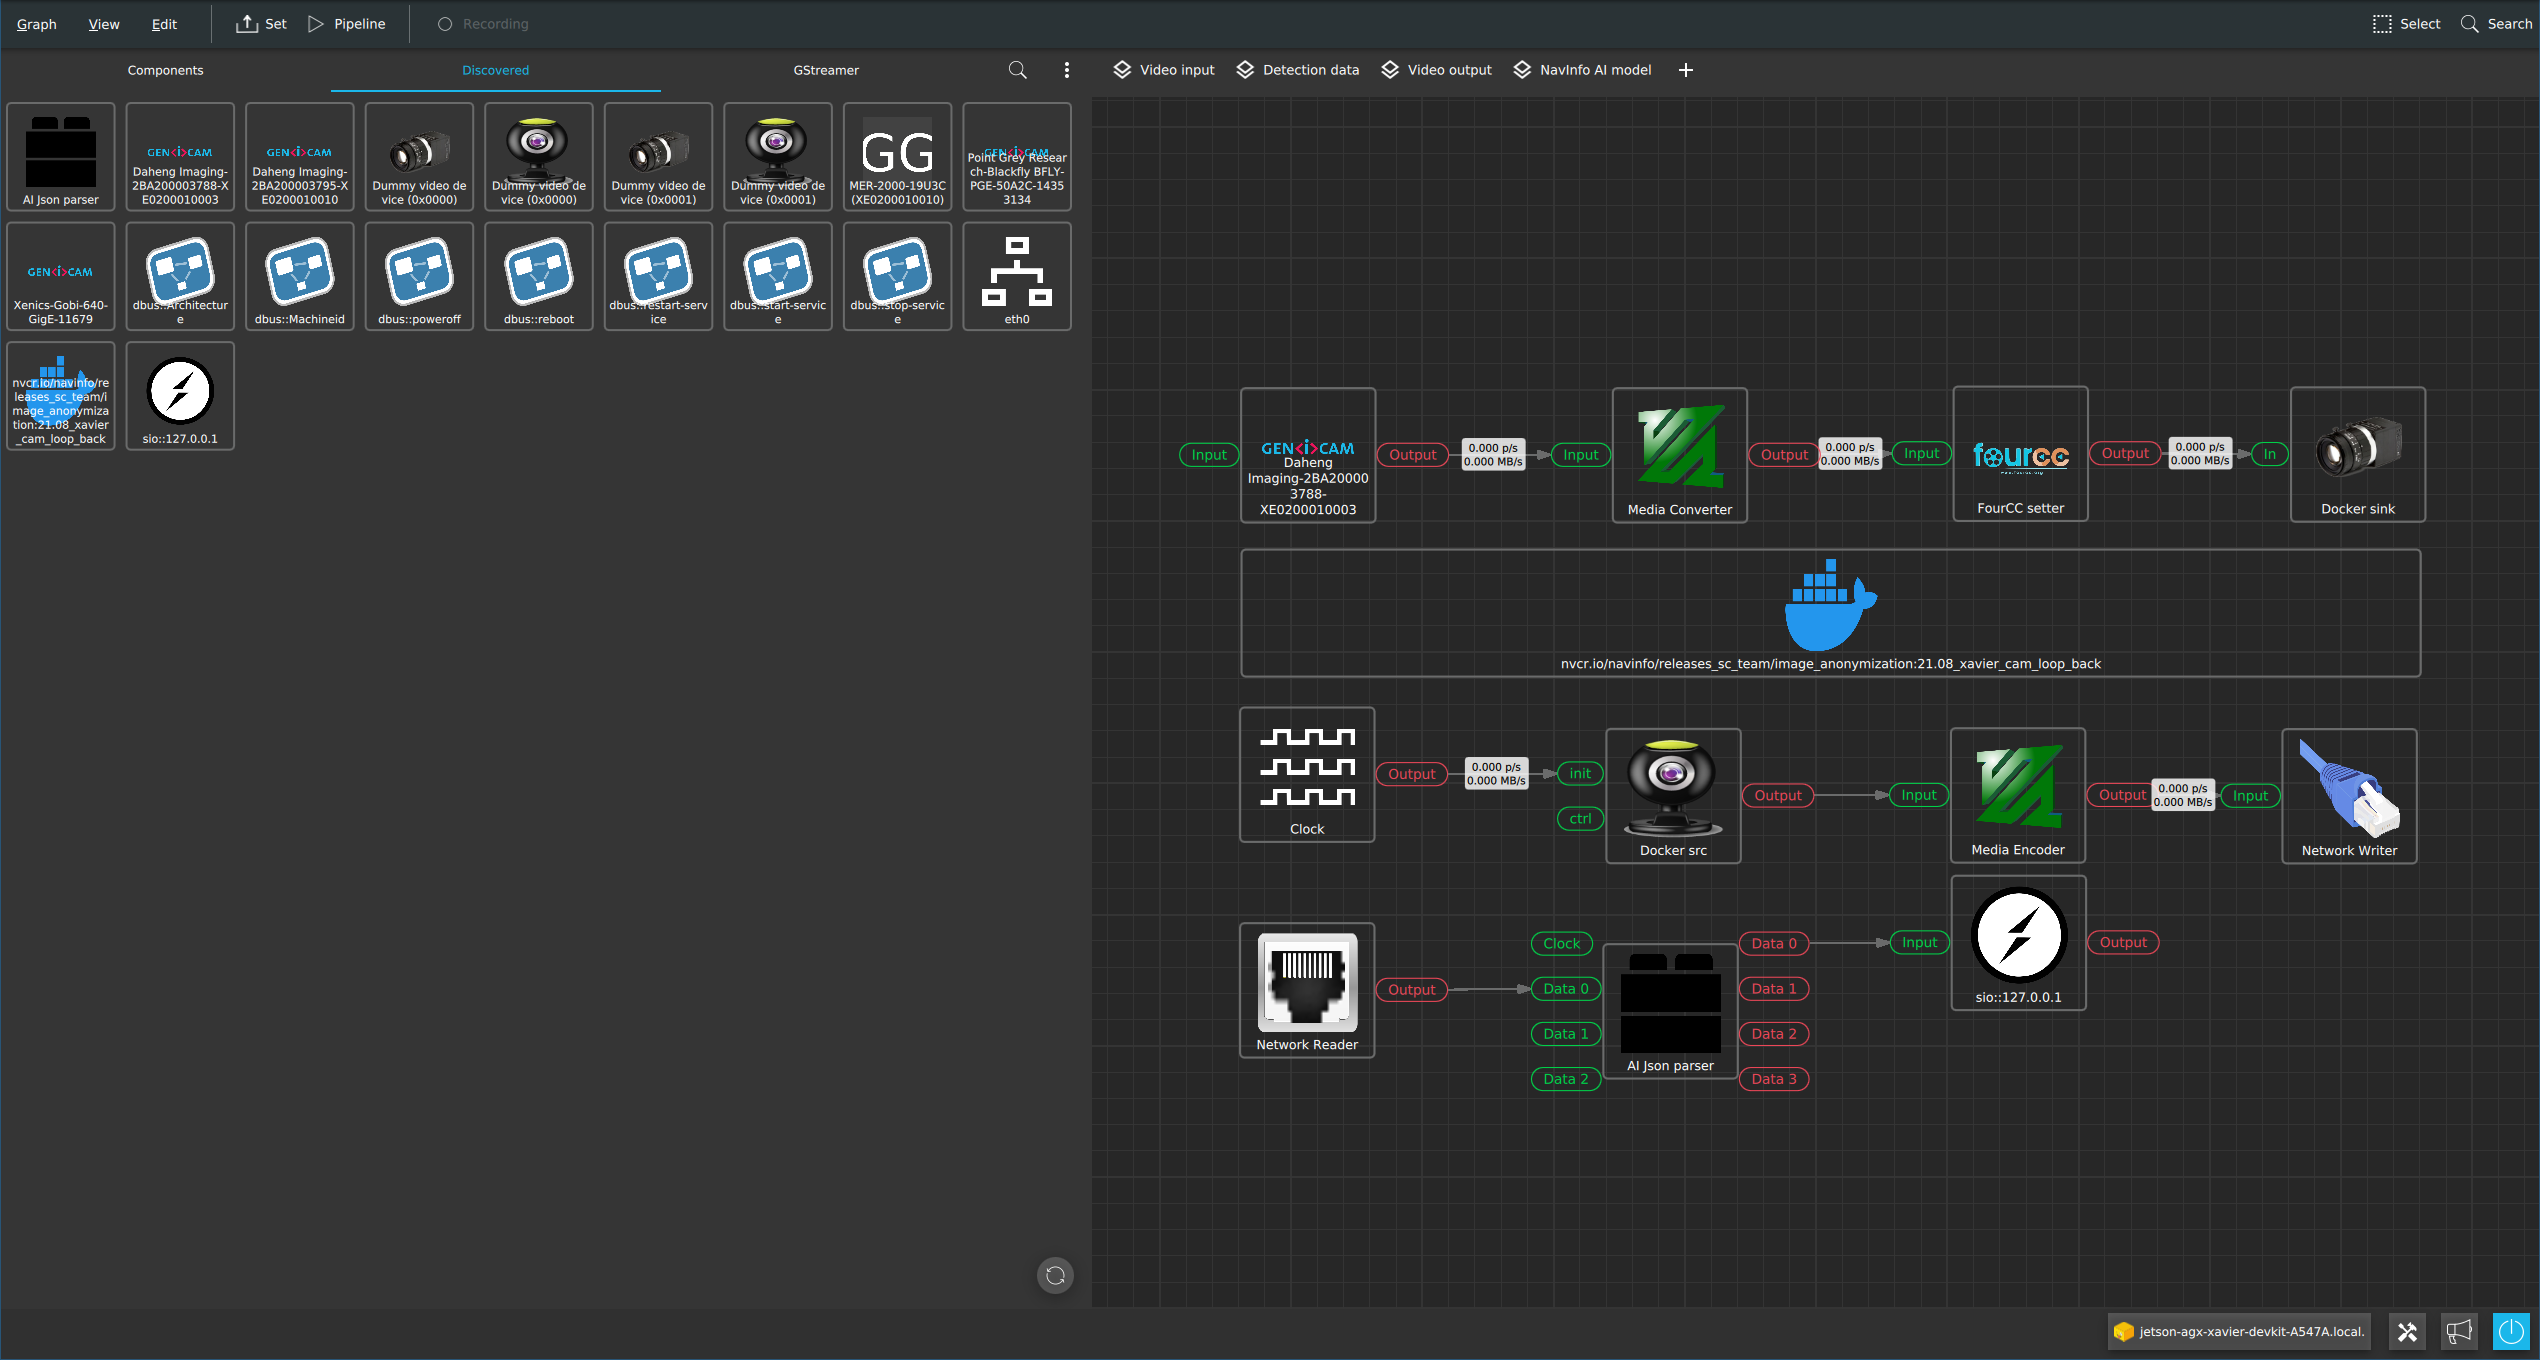
Figure 2: The Discovered Components tab
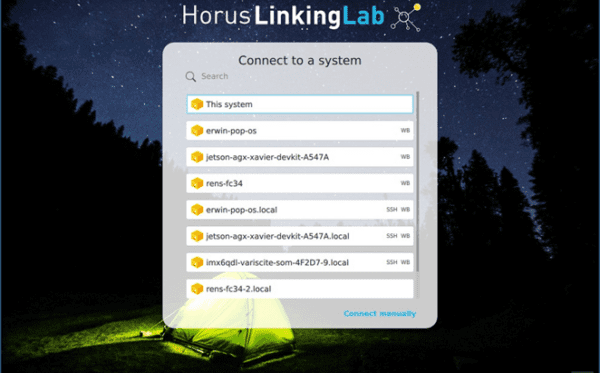
Figure 3: Horus Linking Lab startup window
Horison Framework in a nutshell
The HORISON Framework contains all the necessary tools and programs that are needed to deliver an end product. This includes the creation of Linux images, toolchains, application server (System V2), design tool (Linking Lab) and user interfaces (Web Builder). For this blog post we will cover the application server and design tool briefly.
System V2.
The main application is called System V2 (V2), this is an application server which will run the designs made with the Linking Lab software. In many cases V2 is running on a remote machine, for example an embedded board like an NVIDIA Jetson Xavier AGX, while the designer is working in Linking Lab on his local desktop. The workflow is straight forward: design, save, upload and run.
Linking Lab
An application engineer uses Linking Lab to design a system. All V2 systems make themselves known on the local network (figure 4), and you simply select which device you would like to configure. After this, Linking Lab will reflect resources that are available for the specific device such as: cameras, GPU’s and services.
Designing a GDPR compliant live camera system
NavInfo Europe, an experienced AI technology provider based in the Netherlands, develops its robust computer vision and AI solutions and has proven expertise by successfully deploying its robust solutions to automotive, road-authorities and smart city providers.
Protecting privacy is becoming mandatory in many territories across the world and there has been a noticeable increase in privacy-related regulations globally, including the GDPR in Europe, CCPA in California, CSL in China and APPI in Japan. To support organizations being compliant with these regulations, NavInfo Europe has developed a state-of-the-art AI model to anonymize personal information like faces and license plates.
This model, incorporated in a Deepstream 6 container in combination with the HORISON Framework, enables real-time video anonymization. Below we will show how to use the HORISON Framework to build a system grabbing video data, pass it through the container and use the output in the system again. All this runs real-time on a Jetson Xavier AGX in the local network.
Steps
1/5. Download image and flash the Jetson
To prepare the Jetson with the complete HORISON Framework there are images available for download here. To find the installer, click on: Windows->x64 ->LinkingLab. The Jetson images are built using Yocto and based on the NVIDIA Jetpacks (images for other devices are available too). To flash the device, unpack the archive on a Linux machine, put it into recovery mode, connect the USB port and run the doflash.sh script.
The images provided are built to run in a production environment. The core rootfs is read-only and there are overlays in place to store configuration data. By using Mender, the system is also able to be updated over- the-air or by transferring an update artifact.
2/5. Linking Lab and activation
After flashing the Jetson, it’s ready to be configured. To do this, get Horus Linking Lab for either Linux or Windows.
Start Linking Lab, this brings you to the devices overview screen. By default Linking Lab also starts a local V2 application server. This is shown by the This system entry in the overview. If the Jetson is in the same local network as the local machine, it will be discovered automatically. Simply click on the Jetson to connect to it and start configuring.
To get access to the complete component library, a license should be activated. Go to the License Manager to enter the license or start a free trial. This license is then bound to the connected device.
3/5. Docker configuration
To use a Deepstream 6 Docker image on the Jetson with the HORISON Framework a couple of things have to be configured. First, an extra storage device is needed to store the images. For example, by installing an NVME SSD or USB drive.
After installing the storage device, mount it to a preferred location and make it persistant in /etc/fstab . Then configure Docker to use this mount as the data root.
In /etc/docker/daemon.json add:
| { “data-root”: “/mnt/docker” } |
Now restart Docker ( systemctl restart docker ) and pull the container from your registry to use it in V2.
4/5. Application design
In this blog we design an application with a Deepstream 6 container provided to us by NavInfo (the end result is shown in figure 1). This Deepstream 6 container has the following interfaces which System V2 can use to stream data:
- V4L input
- V4L output
- TCP JSON output
To start designing the application, open the Graph Builder window in Linking Lab. Here, all the available components are shown which can be used on the device. By simply dragging the components onto the graph and connecting them the application can be constructed. After “setting” the pipeline, the application will be uploaded to the System V2 application server on the Jetson. For example, to grab and view a video stream from a discovered GenICam camera, go to the Discovered tab, drag it onto the graph and configure it as follows:
Video 1: How to quickly view a GenICam camera with the Graph Builder
The Discovered tab (figure 2) shows all the detected components on the Jetson, this includes the previously pulled Docker container. To use a Deepstream 6 container in V2 drag it on to the graph like any other component. Double click the Docker component to show its properties. The settings property is a JSON string containing Docker properties directly passed to the Docker daemon. Make sure it contains at least the following:
| {“HostConfig”:{“Runtime”:“nvidia”,”Privileged”:true,”NetworkMode”:“host”}} |
This allows the container to access the NVIDIA dependencies and use the Jetsons hardware. The other properties give an easy way to configure mounts, ports (although not needed in NetworkMode: Host ) and environment variables. Using these properties it’s possible to set up a working Deepstream 6 container.
To use all the features V2 offers, a bit more configuration is required. For example, V2 supports a wide range of cameras (V4L, GenICam, ONVIF, etc.). To use these as an input for the Deepstream 6 container, there is support for the V4L loopback driver. However, not all cameras output the correct video format, so a couple of components may be needed to transform it.
First the Media Converter allows for rescaling and transforming of pixel formats. This can be used to create the required format for the Deepstream 6 container. But as not all video format ID’s are compatible with the V4L FourCC codes, the FourCC Setter component was built to apply the correct code onto the video buffers. Thus making sure that the video stream is correctly interpreted by V4L.
When the video stream is in the correct size and format and has the proper FourCC code, it can be streamed to the V4L output component. This component will create a new capture device in Linux which can be mounted in the Deepstream 6 container. To do this add the following mount to the Docker component:
| /dev/video<X>:/dev/video<Y> |
where X is the V4L identifier of the Xavier and Y is the V4L identifier used in the container. Now the container will use the V4L device created by V2. Because of the broad range of features in V2, this allows many more things to be done with the video stream. V2 supports projections, stitching and much more. All this without altering the Deepstream 6 container or AI model.
To use the results produced by the container (video stream, detection data, etc.) in V2 there are multiple options. For video the most efficient manner would be to let the Docker container write to another instance of the same V4L loopback driver. V2 will discover the capture device like any other V4L capture device. To do this, first add another mount to the Deepstream 6 container with a second V4L loopback device. Then rediscover devices while the container is running to detect the newly created capture device and drag it onto the graph.

Figure 4: The V4L stream from the Deepstream 6 container
The information of the capture device is stored in the pipeline (figure 4) so that the next time it will be loaded automatically. However, because this device can be created some time after the Horus pipeline is started it is possible to connect a clock component to the init pipe of the V4L Capture component. This will make sure that the component will retry opening the stream on a set interval. Another, less efficient, option would be to stream through a network protocol (RTSP, TCP, UDP).
To receive detection data separate from the video stream, a TCP or UDP stream can be used. Using the Network Reader a raw socket can be opened to receive ASCII strings. Depending on the string representations this string can be converted to V2’s internal message protocol. This makes it possible to use the detection data to trigger all kinds of things (video scaling, IO control, etc.). However, because not all protocols are open there is the Code Block component. This component allows third parties to create their own component implementation to convert their proprietary protocol to V2’s messaging protocol.
5/5. Transforming the NavInfo protocol with Code Block
To show the ease of the Code Block component, the JSON output of the NavInfo container is transformed to the Horus protocol. The complete implementation can be found here. In this case, the container outputs a JSON string in the following format:
{ “height”: 480, |
Each object represents a detected object, for this model a face or license plate. The Code Block iterates all the detected objects and creates a new message for each detection.
This message contains three sensor values: a vector of doubles representing the detection bounding box, a string value with the detected category and a double value with the detection’s score. When outputted using the Console Writer component (an useful component for debugging purposes), it looks as follows:
============================== :: Message :: :: Sensor :: |
These messages can then be used to trigger other components or systems to act when something is detected. Using a Sensor Filter component a single scalar value can be checked for a certain value. Using a Matrix Filter component the bbox vector can be scanned for a certain area within the image. Using the Network Reader/Writer components the data can be sent to a completely different device and trigger something elsewhere.
The Sand Engine application in Linking Lab
Background
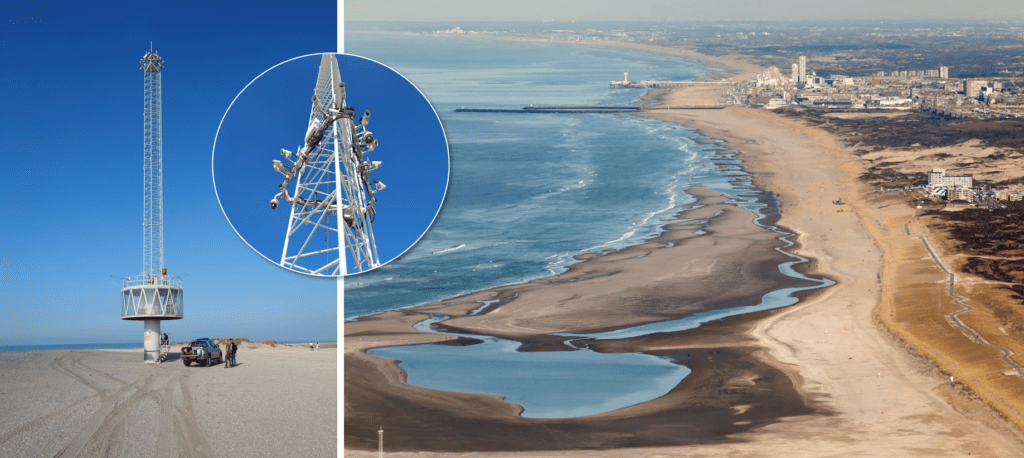
The Sand Engine is a large-scale peninsula just off the Dutch coast. This is an open-field labrotory where Delft University of Technology researches multiple subjects regarding sustainable coastal protection. This is of great importance in view of climate change and sea level rise. To register the changes over time, Horus was asked to record the beach.
Technical solution
Streaming platform
We built the streaming platform including the capturing camera hardware, the HORISON Framework and streaming flows (ONVIF) to stream high resolution imagery to the remote server for further research projects.
Challenges
The challenges were limited resources like limited network bandwidth (4G) and power constraints.
Technical solution
Because of the power limitations but high video processing demands, the Jetson Xavier AGX was chosen as heart of the system. Two high resolution cameras were chosen with wide angle lenses. The Jetson debayers and then encodes the images to cope with the limited 4G bandwith. To further help save bandwith and network costs, V2 allows the user to rescale the images and change the framerate on the fly.
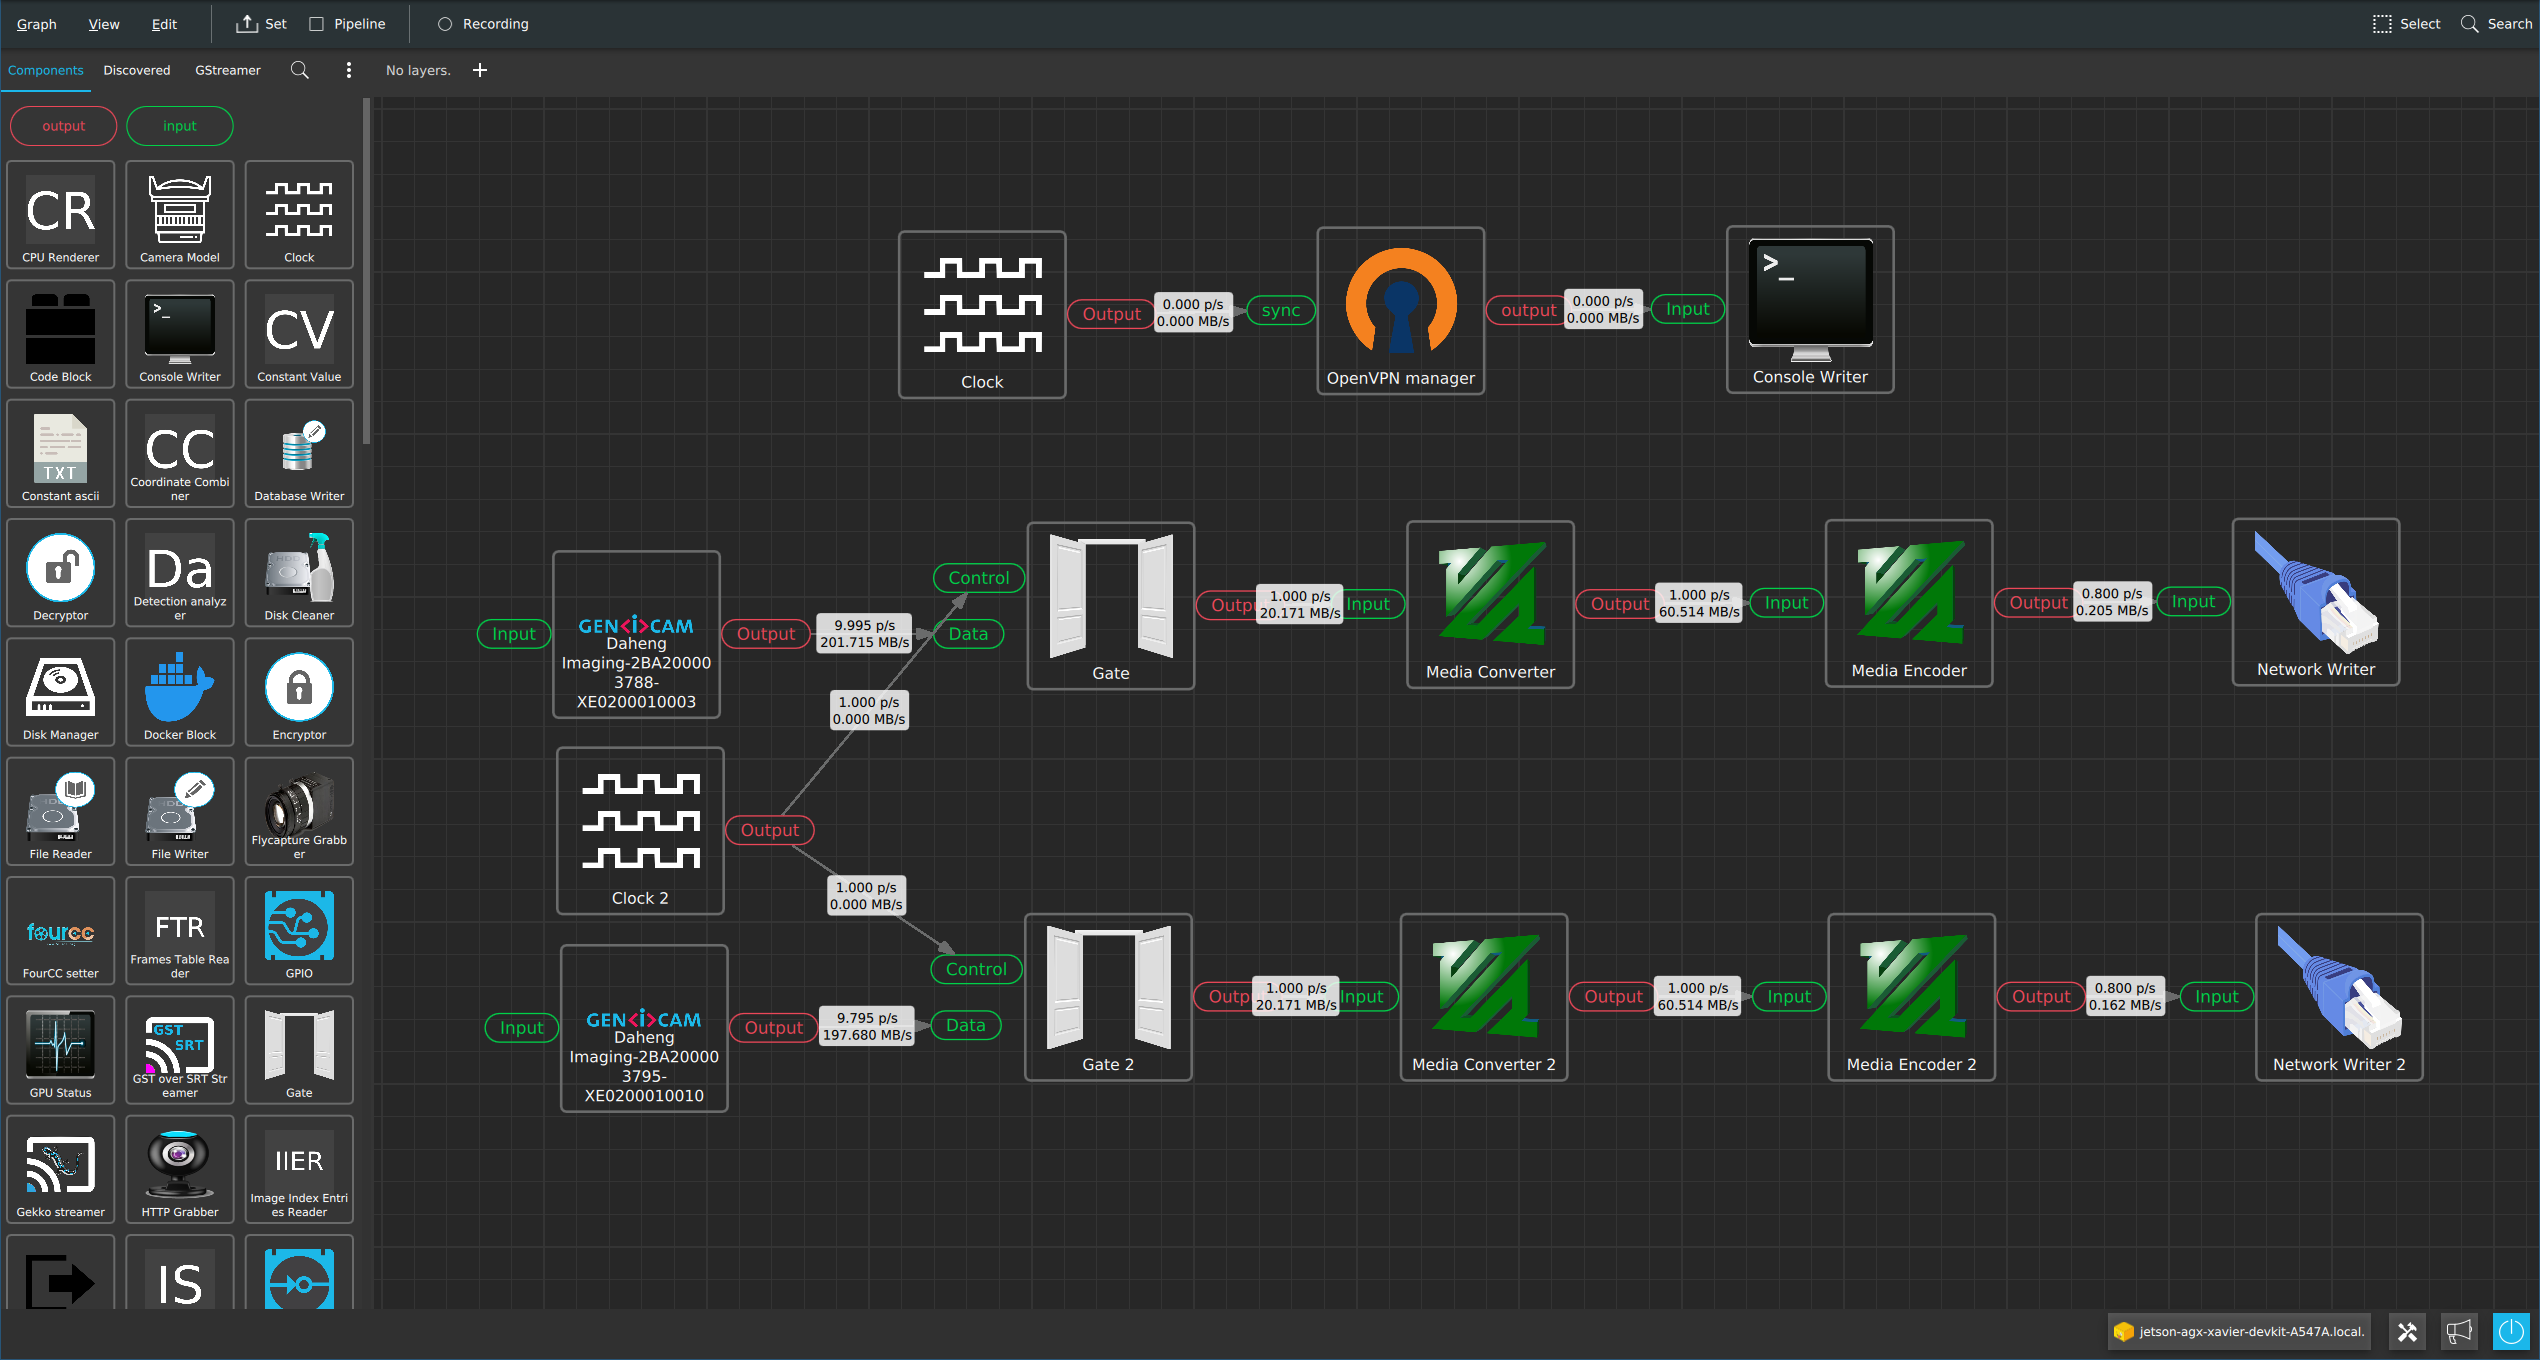
Figure 5: The Sand Motor application in Linking Lab
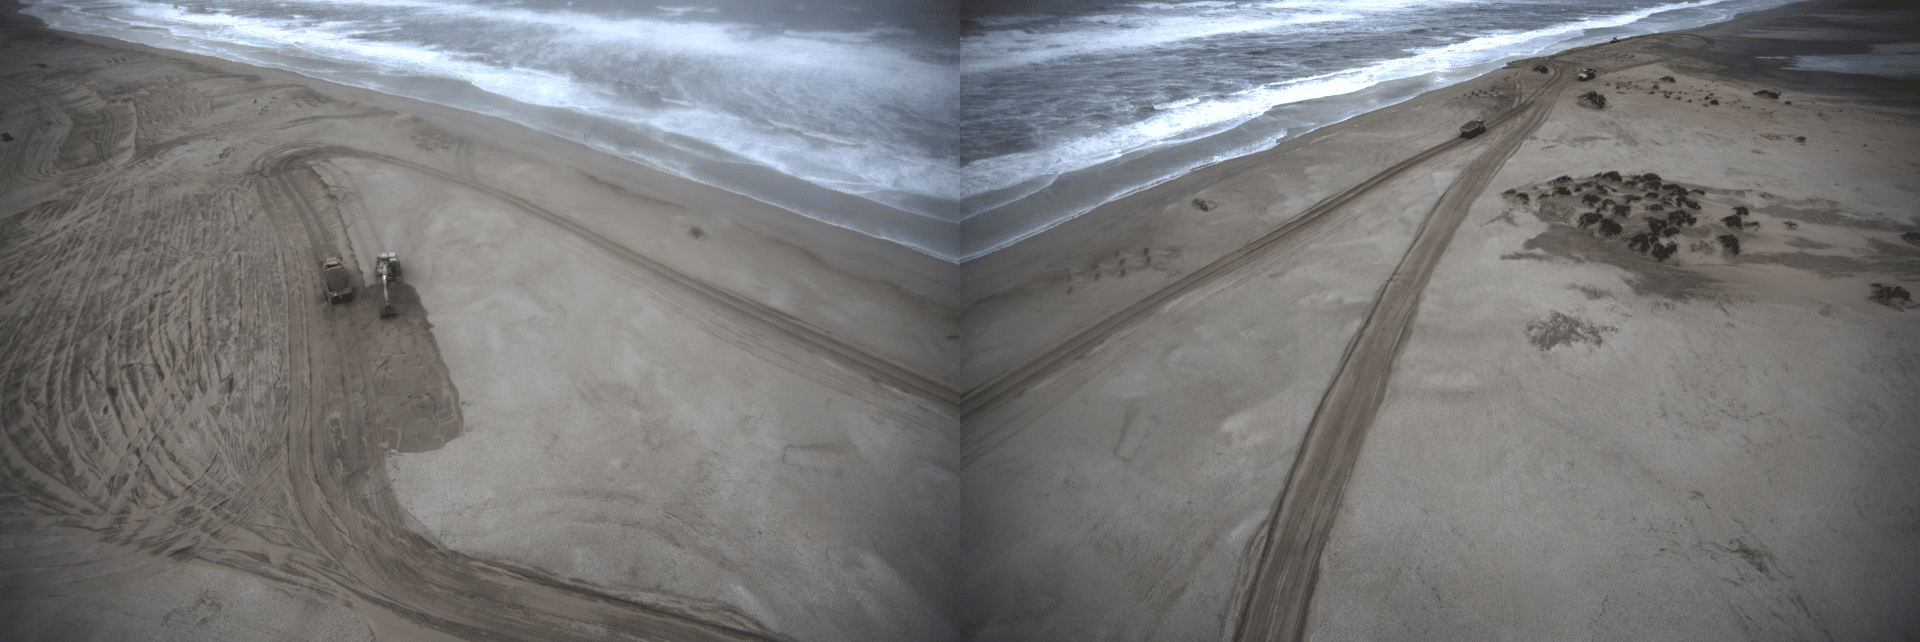
Figure 6: The images from the two cameras
Just the begining…
This is just the beginning. With the Horison Framework we could add very easily extra new sensors and AI models to make the video platform more versatile and unlock functionality like:
- utilizing the power of Deepstream 6 to control dynamic video scaling. An AI that looks for changes in the environment which in turn controls the framerate and resolution of the video stream. For example sending higher resolution images more often when the weather is more volatile. To help with the limited bandwith of 4G T-Mobile has offered to give access to their 5G network that is available in the area.
- Real time blurring of visitors on the beach and being GDPR compliant by extending an ONVIF monitoring camera with the capability to record blurred images when people are detected. The HORISON Framework will grab the existing video stream on a Jetson device and send it to the DeepStream Docker container. The detection metadata is then used to trigger recording of the blurred images when a face is detected. The HORISON Framework will also create a new ONVIF server which allows the raw video stream as well as the blurred video stream to be discovered on the network by ONVIF clients.
// Wondering how we can accelerate your integration?